swag
swag
swaggo/swag 是 Swagger API 2.0 在 go 语言中的一个实现,通过在书写指定格式的注释就可以生成swagger.json和swagger.yaml类型的接口文档,方便导出和导入。
仓库:swaggo/swag: Automatically generate RESTful API documentation with Swagger 2.0 for Go. (github.com)
文档:swaggo/swag: Automatically generate RESTful API documentation with Swagger 2.0 for Go. (github.com)
swag 默认支持的 web 框架如下所示,本文以 gin 为例子,来演示 gin 结合 swagger 快速生成接口文档的例子。
提示
如果不熟悉 swagger 语法,可以前往About Swagger Specification | Documentation | Swagger
安装
首先下载 swagger 命令行工具
go install github.com/swaggo/swag/cmd/swag@latest然后下载 swagger 源码依赖
go get github.com/swaggo/swag提示
为避免出现问题,两者版本必须保持一致。
然后下载 swagger 的静态文件库,html,css,js 之类的,都被嵌到了 go 代码中。
go get github.com/swaggo/files@latest最后下载 swagger 的 gin 适配库
go get github.com/swaggo/gin-swagger@latest因为本文是只用 gin 做示例,其他 web 框架的适配器请自行了解,基本都是大同小异。
使用
使用 go mod 创建一个最基本的 go 项目,新建main.go,写入如下内容。
package main

import (
  "fmt"
  "github.com/gin-gonic/gin"
)

// @title           Swagger Example API
// @version         1.0
// @description     This is a sample server celler server.

// @contact.name   API Support
// @contact.url    http://www.swagger.io/support
// @contact.email  support@swagger.io

// @BasePath  /api/v1
func main() {
  engine := gin.Default()
  engine.GET("/api/v1/ping", Ping)
  engine.Run(":80")
}

// Ping godoc
// @Summary      say hello world
// @Description  return hello world json format content
// @param       name query    string  true  "name"
// @Tags         system
// @Produce      json
// @Router       /ping [get]
func Ping(ctx *gin.Context) {
  ctx.JSON(200, gin.H{
    "message": fmt.Sprintf("Hello World!%s", ctx.Query("name")),
  })
}
这是一个很简单的 gin web 例子,main 函数上的注释是文档的基本信息,Ping 函数则是一个普通的接口。接下来执行命令生成文档,默认是在main.go同级的 docs 目录下
swag init修改main.go代码
package main

import (
    "fmt"
    "github.com/gin-gonic/gin"
    swaggerFiles "github.com/swaggo/files"
    ginSwagger "github.com/swaggo/gin-swagger"
    // 匿名导入生成的接口文档包
    _ "golearn/docs"
)

// @title           Swagger Example API
// @version         1.0
// @description     This is a sample server celler server.

// @contact.name   API Support
// @contact.url    http://www.swagger.io/support
// @contact.email  support@swagger.io

// @BasePath  /api/v1
func main() {
    engine := gin.Default()
    // 注册swagger静态文件路由
    engine.GET("/swagger/*any", ginSwagger.WrapHandler(swaggerFiles.Handler))
    engine.GET("/api/v1/ping", Ping)
    engine.Run(":80")
}

// Ping godoc
// @Summary      say hello world
// @Description  return hello world json format content
// @param       name query    string  true  "name"
// @Tags         system
// @Produce      json
// @Router       /ping [get]
func Ping(ctx *gin.Context) {
    ctx.JSON(200, gin.H{
       "message": fmt.Sprintf("Hello World!%s", ctx.Query("name")),
    })
}运行程序,访问127.0.0.1/swagger/index.html,界面如下
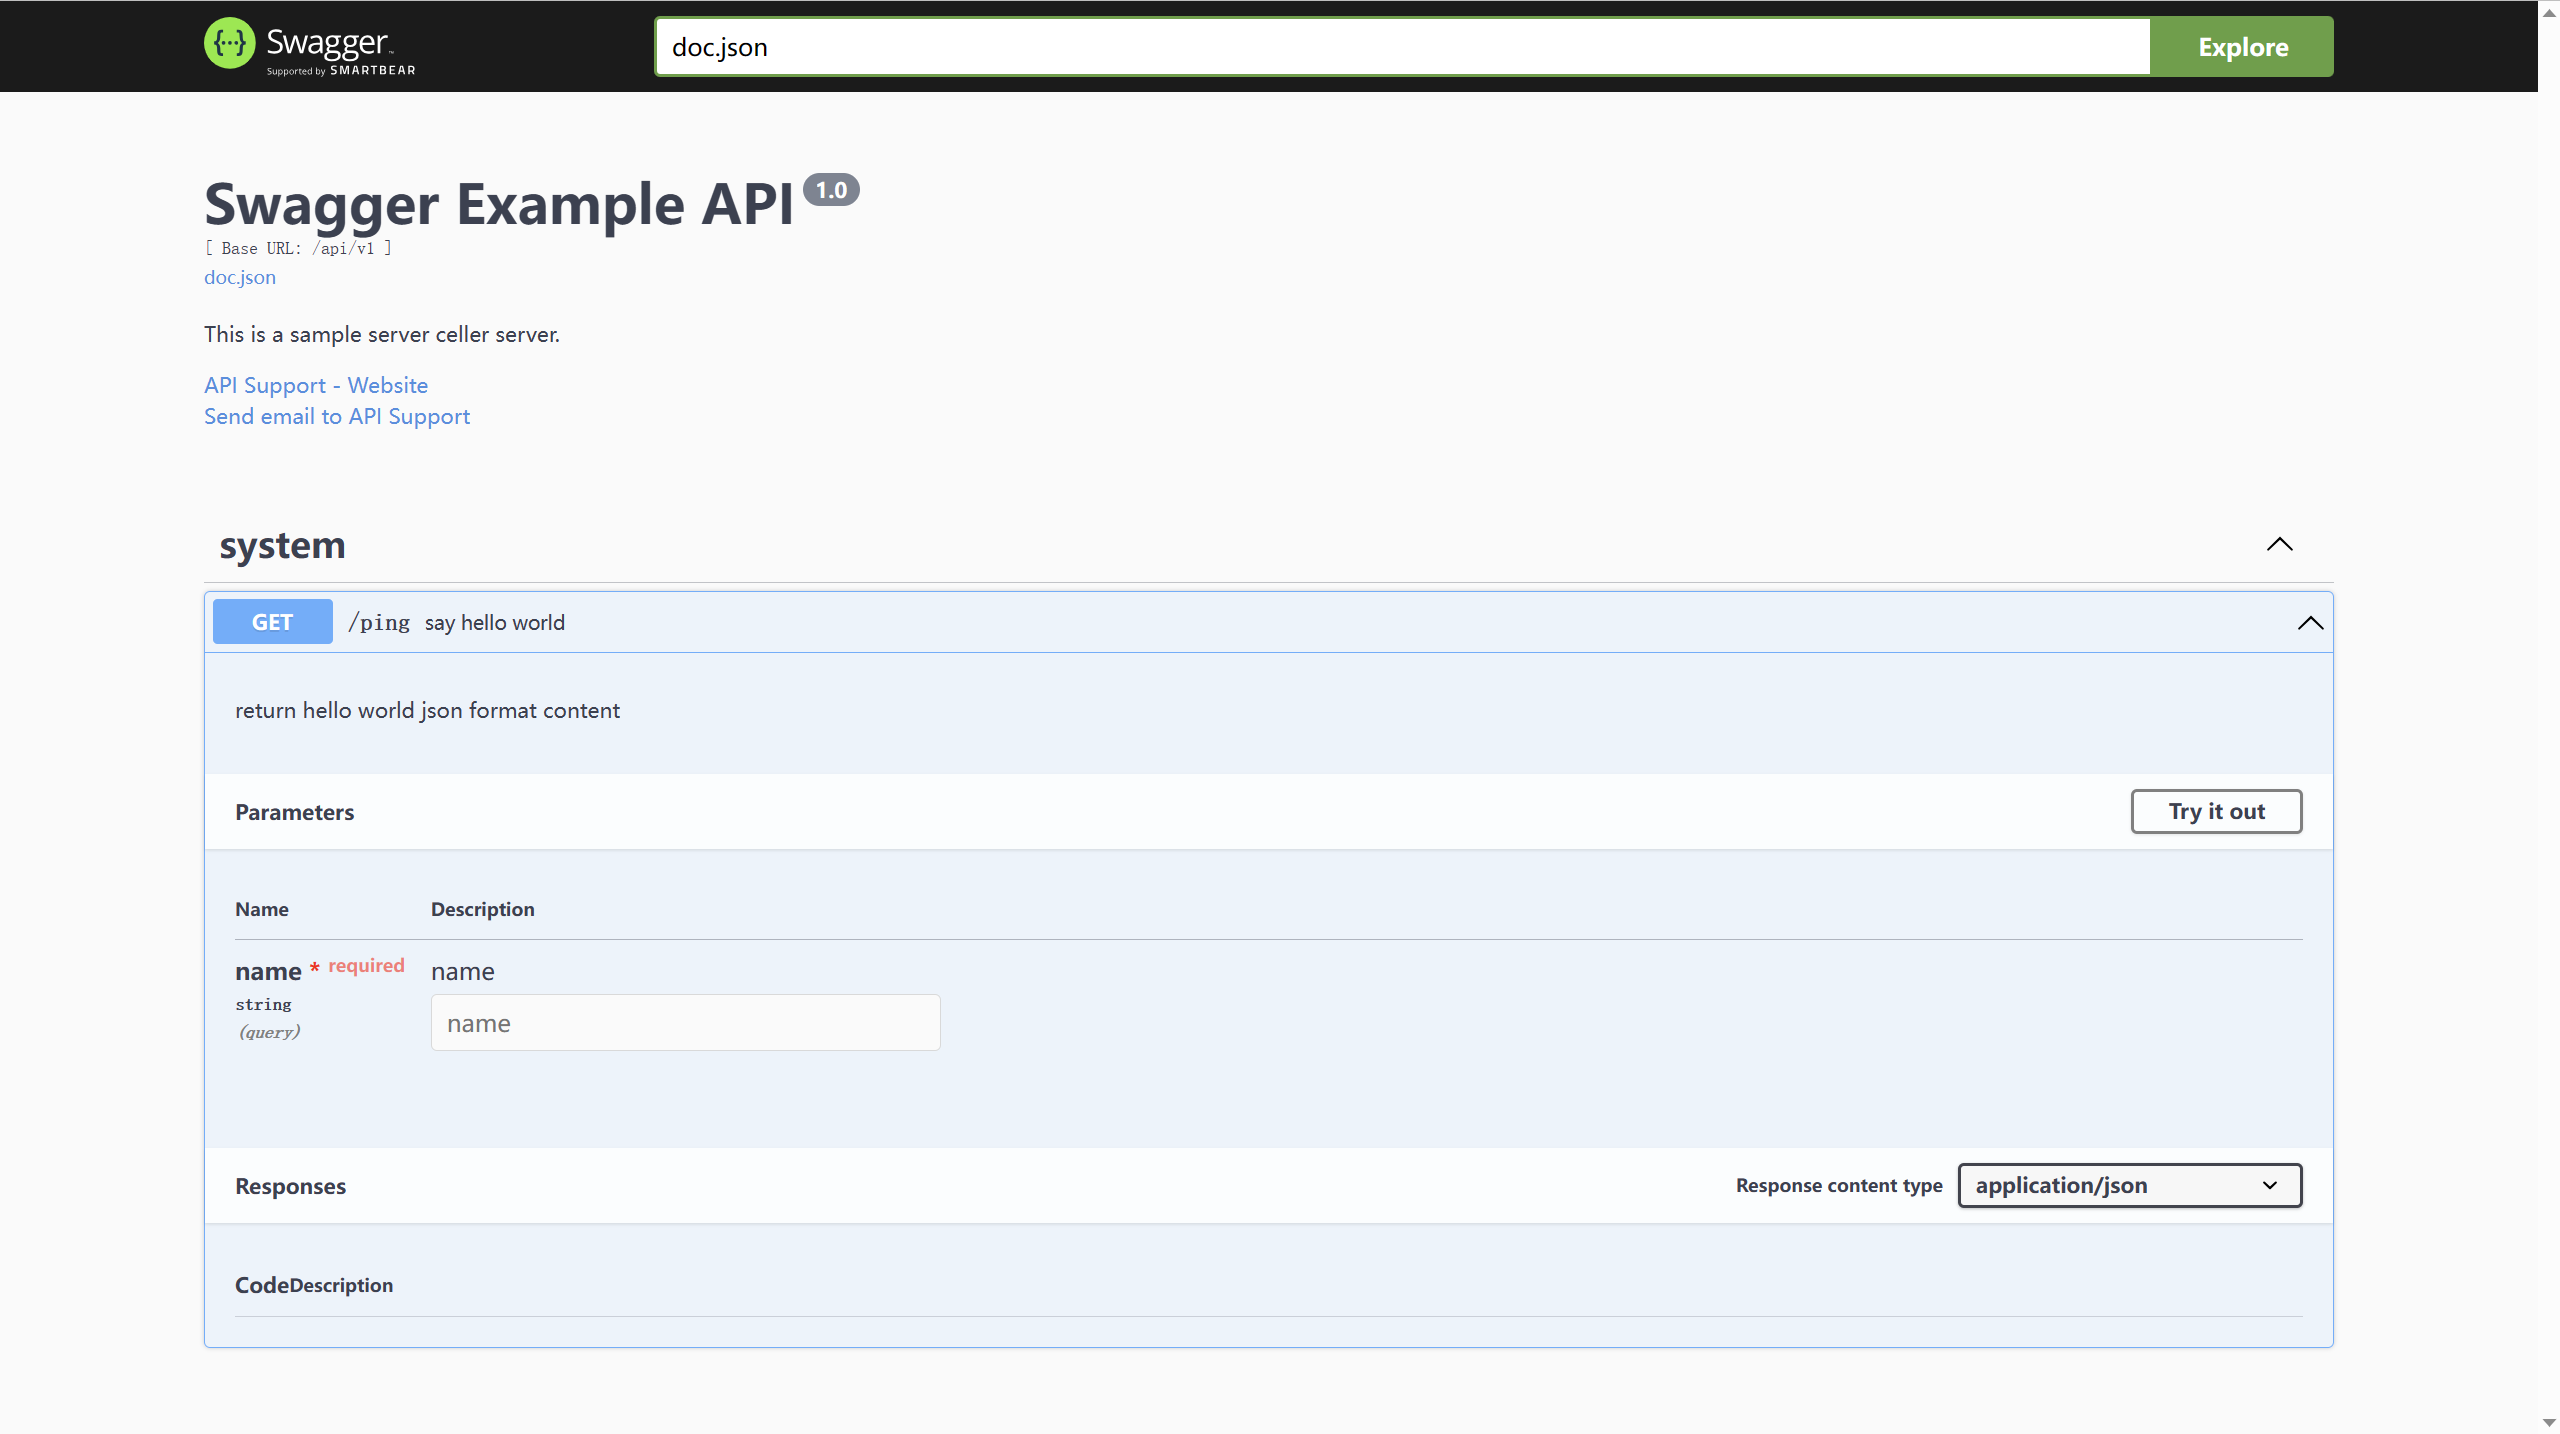
如此便运行起了一个基本的接口文档。接下来除了一些特别要注意的点,基本上和其他语言使用起来没有什么太大的差别。
参数
定义参数的格式为
@param name paramtype datatype isRequired comment一个例子如下
@param userId query int true "user unique id"其中支持的参数类型有
- query
- path
- header
- body
- formData
数据类型有
- string (string)
- integer (int, uint, uint32, uint64)
- number (float32)
- boolean (bool)
- user defined struct
参数类型也可以是你自己的类型,前提是能够被 swagger 扫描到。
响应
定义接口响应的基本格式如下
// @Success      200  {array}   model.Account
// @Failure      400  {object}  httputil.HTTPError
// @Failure      404  {object}  httputil.HTTPError
// @Failure 500 {object} httputil.HTTPError由状态码,基本类型,数据类型组成。{array}表示是一个数组,会展现数据类型的数组形式,{object}就会展现数据类型的原有形式。比如一般我们会定义一个统一的响应体
type JSONResult struct {
    Code    int          `json:"code" `
    Message string       `json:"message"`
    Data    interface{}  `json:"data"`
}Data字段的类型是不确定的,在描述响应用例时,可以将其组合,如下
// 组合
@success 200 {object} jsonresult.JSONResult{data=Account} "desc"

// 数组
@success 200 {object} jsonresult.JSONResult{data=[]Account} "desc"
模型
给结构体字段加注释会被被 swagger 扫描为模型字段注释
package model

type Account struct {
  // account id
    ID   int    `json:"id" example:"1"`
    // username
    Name string `json:"name" example:"account name"`
}其中example标签的值会被作为示例值在页面中展示,当然它还支持字段限制
type Foo struct {
    Bar string `minLength:"4" maxLength:"16"`
    Baz int `minimum:"10" maximum:"20" default:"15"`
    Qux []string `enums:"foo,bar,baz"`
}
所有的模型在使用时都要确保能被 swagger 扫描到,否则不会起作用。
认证
在认证这块支持
- Basic Auth
- API Key
- OAuth2 app auth
- OAuth2 implicit auth
- OAuth2 password auth
- OAuth2 access code auth
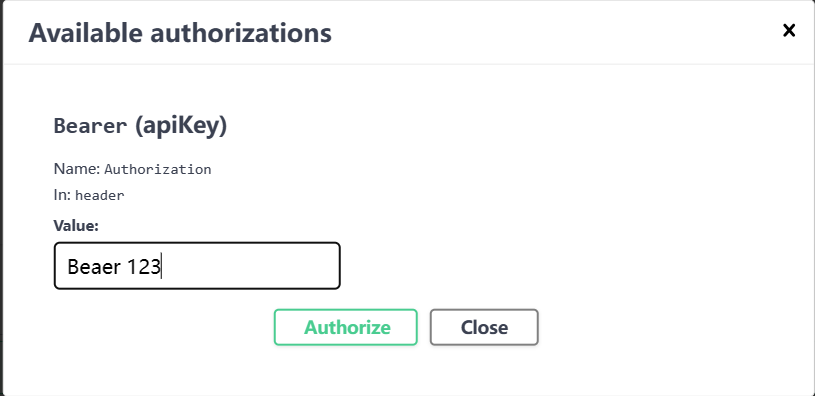
假如接口认证用的是 JWT,存放在 header 中的Authorization字段中,我们可以如下定义
// @securityDefinitions.apikey Bearer
// @in header
// @name Authorization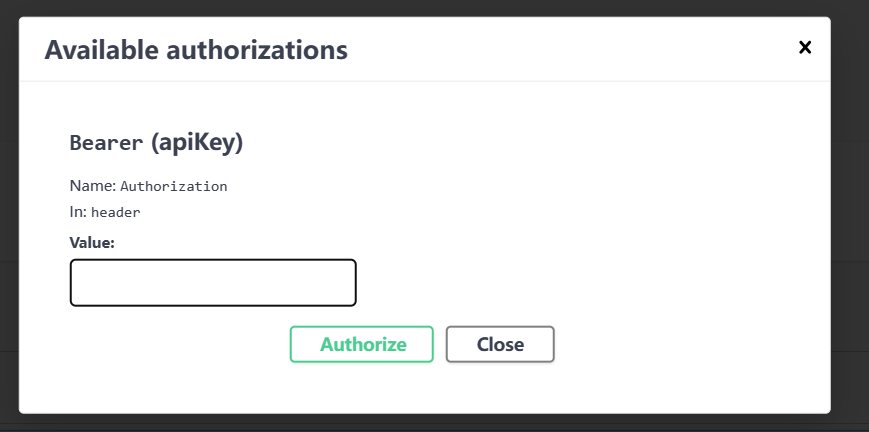
本质上这只是一个 apikey,如果你传入的是 bearer token 的话,需要自己手动加上 Bearer 前缀。
然后在你需要认证的接口上加上如下注释
// @security Bearer它的值是你的securityDefinitions定义的名称。
配置
swag 实际上是将多个不同的 swagger 实例存放在一个 map 中,ginSwagger 作为适配器从实例中读取doc.json也就是 API 接口的定义文件,swaggerFiles 提供静态的 HTML 文件用于展示网页,解析 API 定义并生成界面,整个流程明白以后,就可以进行自定义的操作了。
// Name is a unique name be used to register swag instance.
// 默认实例名称
const Name = "swagger"

var (
  swaggerMu sync.RWMutex
    // 实例表
  swags     map[string]Swagger
)
func CustomWrapHandler(config *Config, handler *webdav.Handler) gin.HandlerFunc {
var once sync.Once
if config.InstanceName == "" {
config.InstanceName = swag.Name
}
if config.Title == "" {
config.Title = "Swagger UI"
}
// create a template with name
index, _ := template.New("swagger_index.html").Parse(swaggerIndexTpl)
var matcher = regexp.MustCompile(`(.*)(index\.html|doc\.json|favicon-16x16\.png|favicon-32x32\.png|/oauth2-redirect\.html|swagger-ui\.css|swagger-ui\.css\.map|swagger-ui\.js|swagger-ui\.js\.map|swagger-ui-bundle\.js|swagger-ui-bundle\.js\.map|swagger-ui-standalone-preset\.js|swagger-ui-standalone-preset\.js\.map)[?|.]*`)
return func(ctx *gin.Context) {
if ctx.Request.Method != http.MethodGet {
ctx.AbortWithStatus(http.StatusMethodNotAllowed)
return
}
// 路由匹配
matches := matcher.FindStringSubmatch(ctx.Request.RequestURI)
if len(matches) != 3 {
ctx.String(http.StatusNotFound, http.StatusText(http.StatusNotFound))
return
}
path := matches[2]
once.Do(func() {
handler.Prefix = matches[1]
})
switch filepath.Ext(path) {
case ".html":
ctx.Header("Content-Type", "text/html; charset=utf-8")
case ".css":
ctx.Header("Content-Type", "text/css; charset=utf-8")
case ".js":
ctx.Header("Content-Type", "application/javascript")
case ".png":
ctx.Header("Content-Type", "image/png")
case ".json":
ctx.Header("Content-Type", "application/json; charset=utf-8")
}
switch path {
// 主页
case "index.html":
_ = index.Execute(ctx.Writer, config.toSwaggerConfig())
// API描述文件
case "doc.json":
doc, err := swag.ReadDoc(config.InstanceName)
if err != nil {
ctx.AbortWithStatus(http.StatusInternalServerError)
return
}
ctx.String(http.StatusOK, doc)
default:
handler.ServeHTTP(ctx.Writer, ctx.Request)
}
}
}通过生成的 go 代码来自动完成实例注册,下方是自动生成的docs.go的部分代码
// SwaggerInfo holds exported Swagger Info so clients can modify it
var SwaggerInfo = &swag.Spec{
  Version:          "",
  Host:             "",
  BasePath:         "",
  Schemes:          []string{},
  Title:            "",
  Description:      "",
  InfoInstanceName: "swagger",
  SwaggerTemplate:  docTemplate,
  LeftDelim:        "{{",
  RightDelim:       "}}",
}

func init() {
    // 注册实例
  swag.Register(SwaggerInfo.InstanceName(), SwaggerInfo)
}可以看到在init函数中有一个 Register 函数用来注册当前实例,如果想要修改实例名称不建议在该文件进行编辑,因为docs.go文件是自动生成的,只需要在生成代码时使用--instanceName appapi参数。为了方便,可以使用 go generate 命令嵌入的到 go 文件中,方便自动生成代码,如下。
// swagger declarative api comment

// @title App Internal API Documentation
// @version v1.0.0
// @description Wilson api documentation
// @BasePath /api/v1
//go:generate swag init --generatedTime --instanceName appapi -g api.go -d ./ --output ./swagger
个人并不喜欢将 swagger 的通用信息注释写在main.go或main函数上,将这些注释写在go generate上方最合适不过。
提示
如果需要多个实例,务必保持实例名称唯一,否则会panic
为了定制化一些配置,需要用ginSwagger.CustomWrapHandler,它相比前者多了一个 Config 参数,释义如下
// Config stores ginSwagger configuration variables.
type Config struct {
  // The url pointing to API definition (normally swagger.json or swagger.yaml). Default is `doc.json`.
  URL                      string
    // 接口列表展开状态
  DocExpansion             string
    // 实例名称
  InstanceName             string
    // 标题
  Title                    string
    // 展开深度
  DefaultModelsExpandDepth int
    // 顾名思义
  DeepLinking              bool
  PersistAuthorization     bool
  Oauth2DefaultClientID    string
}使用swaggerFiles.NewHandler()来替代默认的 Handler,在多个实例时尤其要如此。
engine.GET(openapi.ApiDoc, ginSwagger.CustomWrapHandler(openapi.Config, swaggerFiles.NewHandler()))除此之外还可以进行类型重写等一系列操作,都是比较简单的,更多内容可以阅读官方文档。
注意事项
swag 是根据注释来生成 openapi 的接口描述文件的,在生成时,指定的目录必须要包含接口文档的基本信息,默认是在
main.go里面查找swag init默认指定的是当前目录,值为./,可以使用swag init -d指定多个目录,使用逗号分隔,第一个指定的目录必须包含接口文档的基本信息。例如swag init -d ./,./api-g,接口文档的基本信息的存放文件可以自定义文件名,默认是main.go,在生成文档时,使用-g参数指定文件名swag init -g api.go -d ./,./api该命令的意思是在
./api.go解析接口文档的基本信息,同时在./和./api两个目录下查找和解析其他接口的注释信息并生成对应的文档。-o参数可以指定文档描述文件的输出路径,默认是./docs,例:swag init -o ./api/docs--ot可以指定输出文件类型,默认是(docs.go,swagger.json,swagger.yaml),如果想要使用 go 程序加载 swagger ui,go 文件是必不可少的。swag init --ot go,yaml其余生成的 json 和 yaml 文件可以方便在其他接口管理软件上导入数据。
注释写在哪里都一样,就算不写在函数上也一样能解析,只是写在函数上可读性好一些,本质上还是一个以注释形式和 go 源代码嵌在一起的 DSL。
swag 还支持很多其他的参数,可以使用
swag init -h查看。